Panduan Konfigurasi Dasar Mikrotik
Ketika kita bekerja sebagai IT Staff terutama IT Support, Network Engineer, IT Infrastructure , dan apapun jabatan anda. Atau ketika anda mau buat ISP atau usaha dengan jaringan. Biasa nya menggunakan alat jaringan yang bernama MikroTik. Nah pada kesempatan ini, kita akan bahas bagaimana konfigurasi dasar mikrotik.
Nah, silakkan nyalakan router anda lalu hubungkan seperti diatas. Setelah itu buka aplikasi winbox untuk konfigurasi mikrotik kita, jika belum ada bisa di download dulu ya di mikrotik.com.
Cara konfigurasi MikroTik
1. Ganti nama interface sesuai soal
# Interfaces > klik 2x pada interface Name: “ganti nama sesuai soal” > Apply OK.

Maka akan berubah seperti ini.

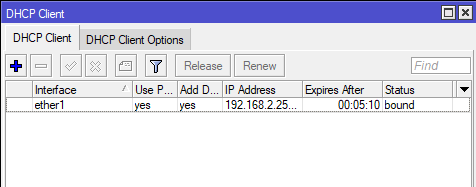
2. konfigurasi Internet (DHCP CLIENT)
# IP > DHCP Client > + > ether1 > Apply OK
Pastikan status bound
Pastikan status bound
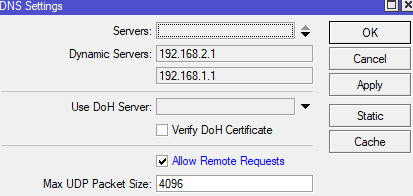
3. Konfigurasi DNS Server
# IP > ceklis Allow Remote Requests > Apply OK.
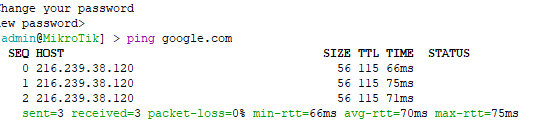
4. Cek koneksitas di NEW TERMINAL
Jika status internetnya berjalan maka terkoneksi.
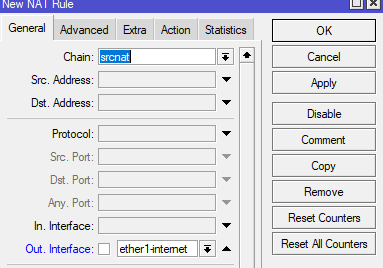
5. Buat Firewall NAT
# IP > Firewall > NAT > +
General
Chain : srcnat
Out, Interface : ether1
Action : Masquerade
Chain : srcnat
Out, Interface : ether1
Action : Masquerade
Apply OK
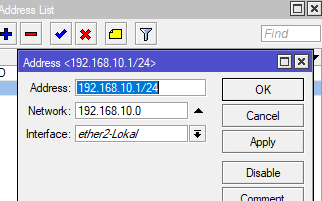
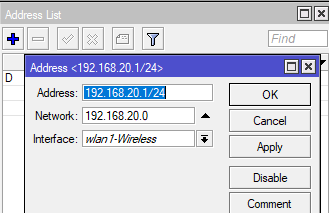
6. Konfigurasi Jaringan Lokal
Membuat IP Address untuk Ether2 dan wireles
# IP > Address > +
Untuk Wireles.
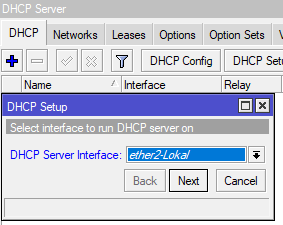
7. Konfigurasi DHCP Server dan DHCP pool (ether2 dan wireless)
# IP > DHCP Server > DHCP Setup
DHCP Server Interface : Ether2
Next sampai sukses.
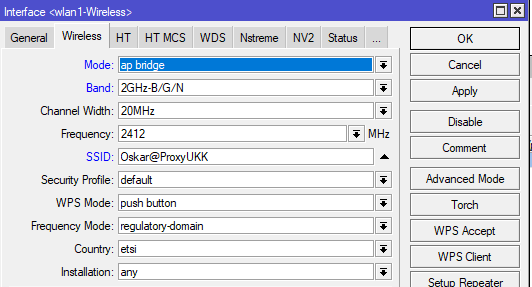
Setting interface wlan
# wireles aktifkan wlan > interface wlan > Wireless
Mode : ap bridge
Band : 2GHz-B/G/N
SSID : Kelompok Mikrotik
Password : 12345678
Apply OK
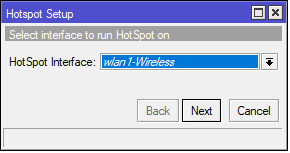
HotSpot Interface : wlan1-wireless
Select Certificate : none
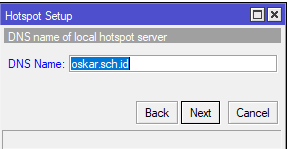
DNS
Name : kelompokmikrotik.sch.id
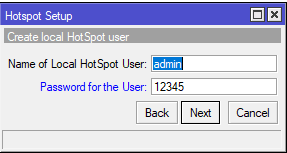
Password for the user : 12345
Apply OK
Next sampai sukses.
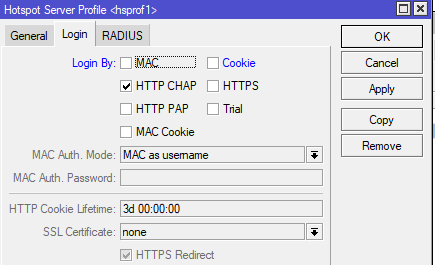
9. Hilangkan ceklis cookie dan ceklis Use Radius
# IP > Server Profil > klik 2x pada server hotspot kita > login > hilangkan ceklis pada cookie > Apply OK
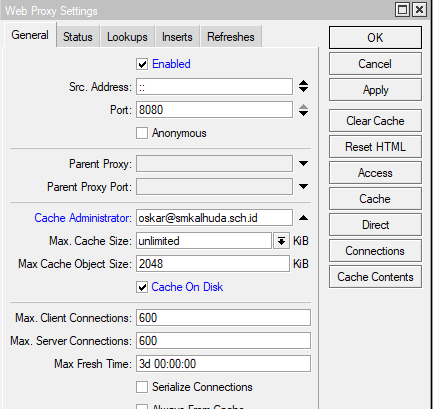
10. Konfigurasi Web Proxy (BLOK WEBSITE)
Seting web proxy
# IP > Web Proxy > general
Ceklis Enable
Cache Administrator : oscar@smkalhuda.sch.id (bebas sesuai soal)
Apply OK
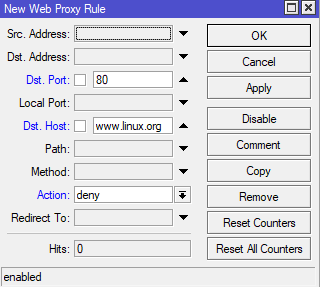
11. Bloking Situs
Kita akan alamat www.linux.org
# IP > Web Proxy > Access > +
Dst. Port : 80
Dst. Host : www.linux.org
Action : deny
Apply OK
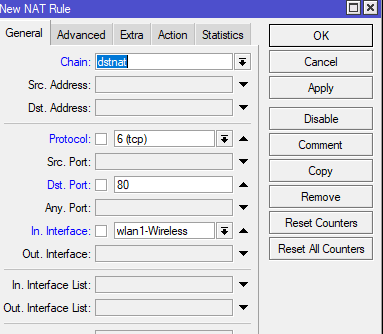
12. konfigurasi Firewall NAT
Untuk blocking website dan file.
Untuk blocking website dan file.
# IP > Firewall > NAT > +
General
Chain : dstnat
Protocol : (tcp)
Dst. Port : 80
In. Interface : Wlan1-Wireless
Action : redirect
To Port : 8080
Apply OK
Tes blok website www.linux.org apakah bekerja atau tidak
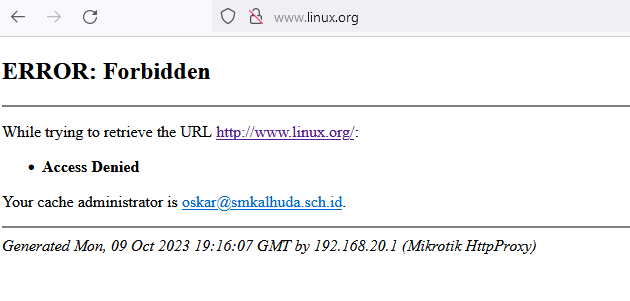
Blok website bekerja.
Begitulah kurang lebih dalam mengkonfigurasi, sekian terima kasih.
4 komentar